ShopDreamUp AI ArtDreamUp
Deviation Actions


Suggested Deviants


Suggested Collections


You Might Like…


Featured in Groups


Description
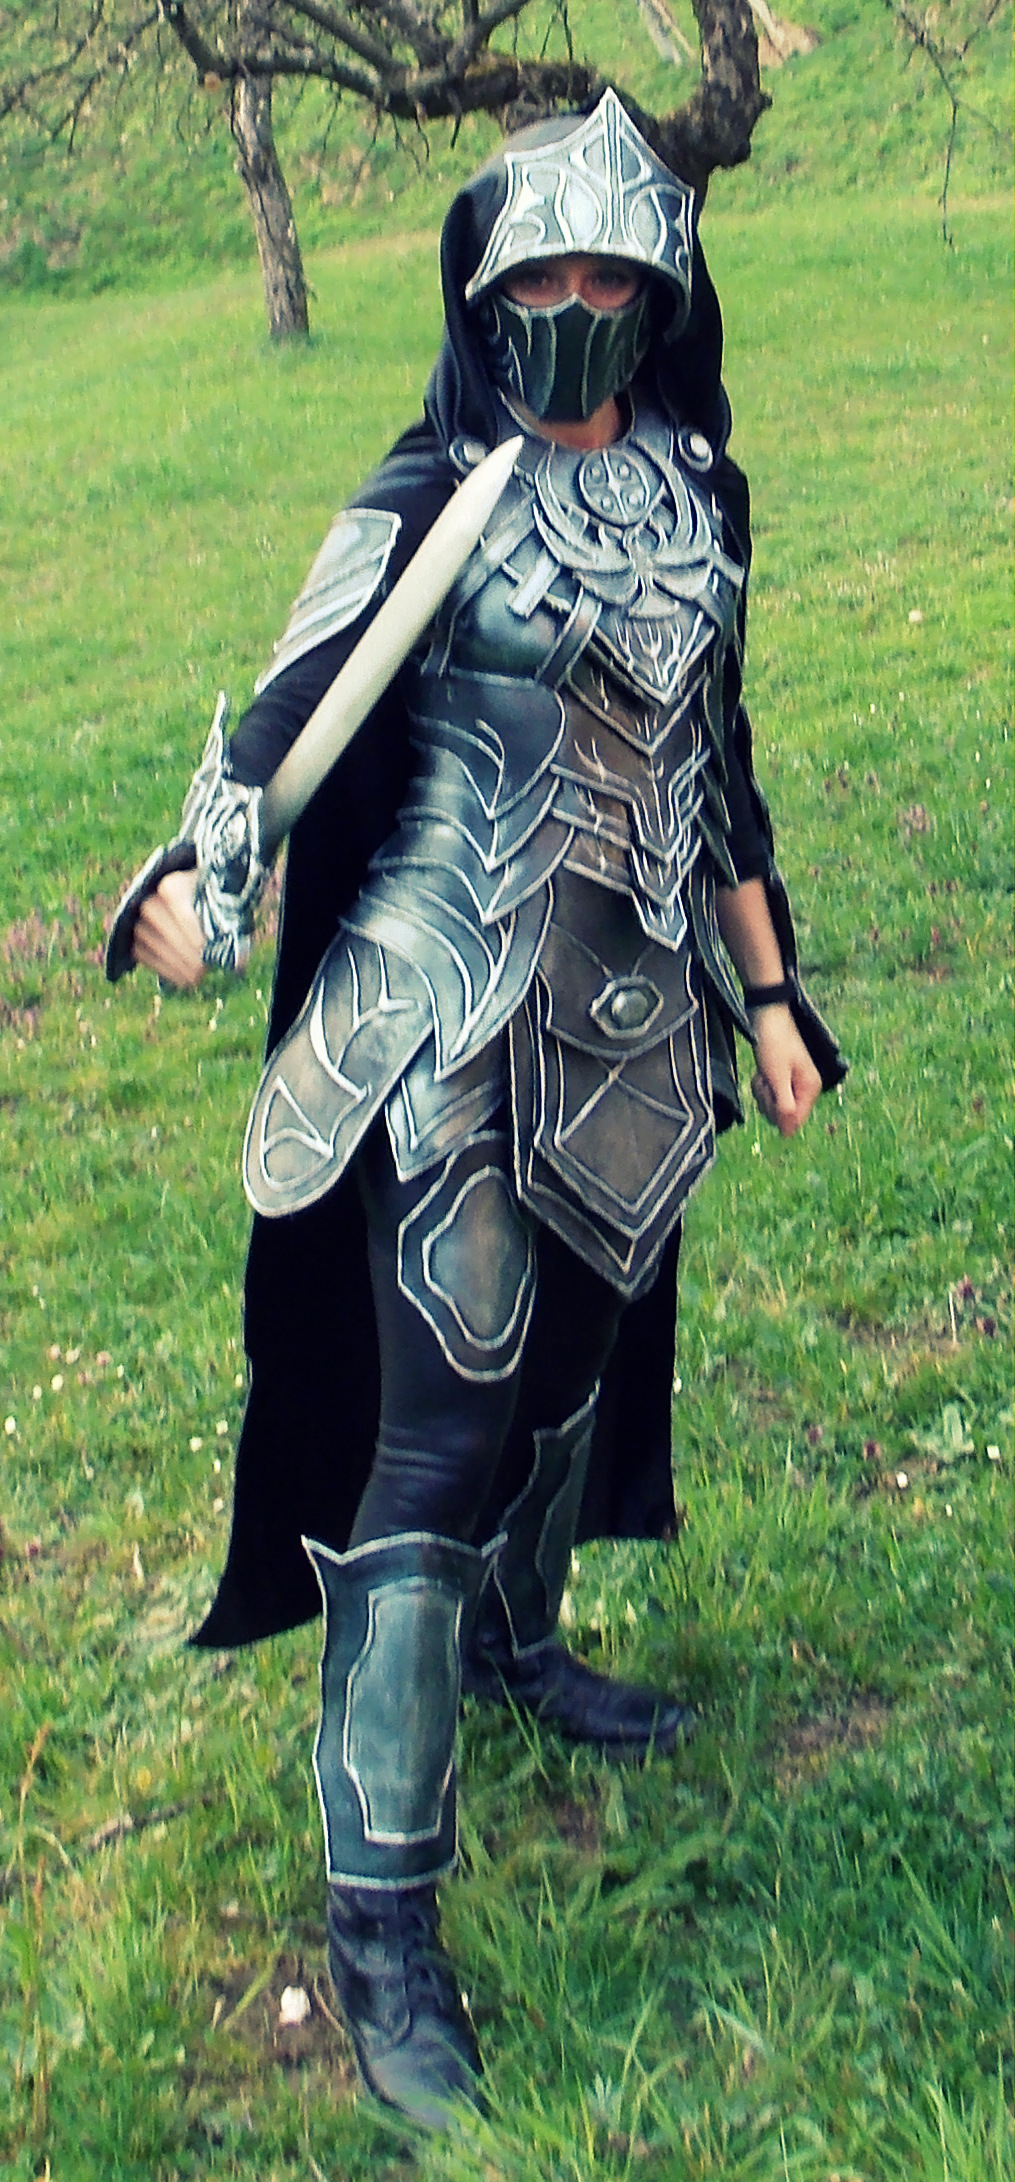
Finally finished! I love how it turned out! ")
The armor took me 1 month to finish. It could be done sooner, but I had to wait for the materials (the shop ran out of craft foam and I misjudged the quantity of hot glue and black spray I needed). Anyway, I'm so happy it's done! I'll also make the bow when I won't be so buisy with school.
Materials used:
- black craft foam
- (a lot of) hot glue
- mod podge/white glue
- black spray
- silver acrylic paint
- little sponge
- black thread and a needle
- gummy & velcro strips
- a cheap sword to remake
- model magic
- a little piece of wire (for the hood piece form)
- magic hands
The craft foam is 6mm thick and covered with 2 - 3 (depends on the piece) layers of white glue/mod podge so the mobility is a bit limited. Sadly. I just love the armor so much I wanna have it on forever haha But I don't want to destroy, so I'm not doing it ")
Making the armor:
First I made a pattern out of paper, copied it onto the foam and then cut it out. Because some patterns are jused more times I copied the best one on the foam as many times needed. I was making the armor piece by piece. First came leg, amr and head armor pieces. I copied them on the foam, cut them out and then used hot glue to make the markings. After every piece had it's mark on I formed them using heat. We have a fire place at home, but also the easiest way (Ithink) is to use a hair dryer. Then I covered the pieces with 3 layers (both sides) of mod podge/white glue. Ofcourse I waited for every layer to dry first (if you are using white glue, I recommend adding A BIT of water, it makes it easier to apply). Next was spraying, first black spray from both sides (1 layer is enough if you cover the pieces well). After the spray dryed (I actually had to wait quite a long time o.o) I put some silver acrylic paint on a plastic plate and the used the sponge to kinda press the paint on the armor, but make sure to not completely cover it in silver, leave the edges on the sides of the markings black. After the paint dryed (it actually dries verry fast) I again used the black spray, this time I used just the misty little parts of the spray to hold onto the armor, to kinda darken the silver. Then again use the sponge to add the silver paint, but this time, press the colour only on the markings. Aaaand it's done! Then next I made the body of the armor. Same strategy used as before. The only difference is that after I had the markings on, the foam was formed and the gummy strips with velcro strips on the ends were sewn on the armor, I glued the pieces together and then covered it with glue/mp. Colouring is the same. Next were the belt and the top of the body (these two were the hardest to make!). It's the same process as with the body armor. To be able to wear the leg, arm and head pieces of the armor, I used gummy strips. I just measured how long strips I need and then glued them down on the bottom sidde of the pieces. After everything was done, I just glued anything else I needed together and voila, there we have the Nightingale armor!
The pictures I uploaded are just randomly taken from my aunt, just to show off my costume, the more photographic pictures are coming in a while
The armor took me 1 month to finish. It could be done sooner, but I had to wait for the materials (the shop ran out of craft foam and I misjudged the quantity of hot glue and black spray I needed). Anyway, I'm so happy it's done!
Materials used:
- black craft foam
- (a lot of) hot glue
- mod podge/white glue
- black spray
- silver acrylic paint
- little sponge
- black thread and a needle
- gummy & velcro strips
- a cheap sword to remake
- model magic
- a little piece of wire (for the hood piece form)
- magic hands
The craft foam is 6mm thick and covered with 2 - 3 (depends on the piece) layers of white glue/mod podge so the mobility is a bit limited. Sadly. I just love the armor so much I wanna have it on forever haha
Making the armor:
First I made a pattern out of paper, copied it onto the foam and then cut it out. Because some patterns are jused more times I copied the best one on the foam as many times needed. I was making the armor piece by piece. First came leg, amr and head armor pieces. I copied them on the foam, cut them out and then used hot glue to make the markings. After every piece had it's mark on I formed them using heat. We have a fire place at home, but also the easiest way (Ithink) is to use a hair dryer. Then I covered the pieces with 3 layers (both sides) of mod podge/white glue. Ofcourse I waited for every layer to dry first (if you are using white glue, I recommend adding A BIT of water, it makes it easier to apply). Next was spraying, first black spray from both sides (1 layer is enough if you cover the pieces well). After the spray dryed (I actually had to wait quite a long time o.o) I put some silver acrylic paint on a plastic plate and the used the sponge to kinda press the paint on the armor, but make sure to not completely cover it in silver, leave the edges on the sides of the markings black. After the paint dryed (it actually dries verry fast) I again used the black spray, this time I used just the misty little parts of the spray to hold onto the armor, to kinda darken the silver. Then again use the sponge to add the silver paint, but this time, press the colour only on the markings. Aaaand it's done!
The pictures I uploaded are just randomly taken from my aunt, just to show off my costume, the more photographic pictures are coming in a while
Image size
1015x2182px 970.57 KB
Make
NIKON
Model
COOLPIX L810
Shutter Speed
10/500 second
Aperture
F/3.1
Focal Length
4 mm
ISO Speed
80
Date Taken
Mar 31, 2014, 5:35:42 PM
© 2014 - 2024 Cita555
Comments0
Join the community to add your comment. Already a deviant? Log In